Wednesday, 21 February 2007

SharePoint 2007: Issues / problems found (and ideally their solutions)

This post will contain problems I have found during the implementation of SharePoint, and hopefully eventually, a solution / workaround.
  1. Permissions - Creating a hybird between unique and inherited permissions.
Let's say you have a parent site which has a Site Owners group. You want that members of the group Site Owners to have full rights to all child sites. So what you do is create a child site, which inherits permissions from the parent site. Now to assign unique permissions you edit the permissions, such that all the permissions are copied from the parent to the child and the child thus gets its unique permissions. Delete all groups (except Parent Site Owners) and create the groups necessary for the child site (Owners / Members / Visitors). Thus we have unique permissions for the child site, however Parent Site owners are still site owners within the child site.

The problems arises if you have removed ALL parent groups from the child site. Once you have created your child groups (Members / Owners / Visitors), you cannot add a parent group to the child groups because you get the error: "SharePoint Groups cannot contain other SharePoint Groups. Remove the SharePoint Group from the Users box and try again."

You you can solve this issue, re-doing all your permission settings and use the suggested solution above, however the ideal situation (at least in my head) is that you would be able to add the Parent Site Owners group into the Child Site Owners group.

Edit: You can add the Site Group of the parent directly. In People and Groups for the Child Site click New > Add Users > Search for Parent Group (e.g. Parent Site Owners), and once you have found the group select Give users permissions directly (Full Control).
  1. Document Library Management of Content Types and Column Ordering

From some testing I have performed, it seems that once you have enabled Management of Content Types (Advanced Settings) in a Document Library, you can no longer set the column ordering in settings of the document library. Once you disable management of content types (Advanced Settings), colum ordering re-appears. I am assuming that this is a bug.

To get around this issue, disable management of content types, and then re-enable it after you've set the column ordering. Your previous content types are retained.

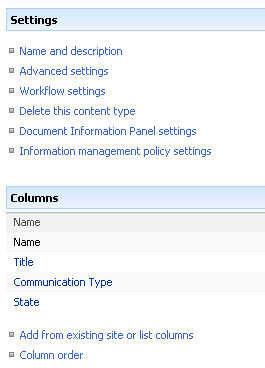
Edit: This is not a bug! Its a feature :) You can actually set the column ordering for each content type. To set the ordering for each content type, you need to click on the content type and click on the Column Order link!

List Settings with Content Type Management disabled. You can see the Column Ordering.


Column Ordering is gone, once Management of Content Types is enabled.

And re-appears as Column Order in the settings of each individual content type ;)

Saturday, 17 February 2007

Favourites icon and Favicon Maker

With the advent of IE7, the favourite icon on your website is much more important than it used to be... whereas before you would rarely see a favourite icon, with IE7 it is now visible immediately on each tab that you open.

To create a favicon in your website there are various ways of doing this:

  • Easiest: create a 16 * 16 pixel ICON image, name it favicon.ico and put it in the root of your website.
  • Easy: put the following tag in your html <link rel="shortcut icon" href="http://www.yourdomain.com/images/favicon.ico" /> with a link to the icon

When I was updating my website which didn't have an icon, I had two options. Either use a software which saves to .ico (Paint Shop doesn't). You can look for a plug-in for your software to enable it to save in icons. Or else find an online site which converts a JPG, BMP, PNG or other image to a (good) .ico version. I opted for the latter. Favicon Maker is a site which allows you to upload your image and converts it to 16 * 16 icon image.
Favicon maker- Create a favicon from any image

Monday, 12 February 2007

Google Tools I Love

Since my first discovery of Google quite a few years back, I've had a serious love affair with the search engine.

I have quite a few philosophical ideas about the company, but its late, I've had a long day and I don't really feel like being very philosophical. Therefore, just a few links to the tools I love best from Google.


  • Google Search - the power of the search should never be underestimated ...
  • Gmail - The amount of free storage available, the instant search, and the AJAX functionality revolutionised the way we think about email.
  • AdSense - If you are a webmaster and aren't using AdSense, then should get out of that rock. With AdSense just pop in a few lines of HTML, and you are earning money. Its a win-win situation, you get money, and the company you love gets money, and keeps providing you with free kinky software ;)
  • AdWords - Instead of paying an insane amount of money, you can control the amount you want to spend, target only your potential clients, choose the keywords you require, and generally have a much better ROI.
  • SiteMaps - define the pages in your site, to be sure that all pages on your website are entered into search engine indexes.
  • Analytics - Free Webstats ... and as with all Google tools, very useful tool, not just another crap piece of free webstats software ... just insert a tiny script into pages you want to monitor, and you're up and running :)
  • Personalised HomePage - yes its true, the simple google interface, with no clutter was one of its charms. But if you want to have a homepage full of widgets, well google can do that too!

There are quite a few other tools I've used, but these are by far the ones which I use most often, and which I think have made a few aspects of my life fairly easier!

SharePoint 2007: Permissions, permissions, permissions.

Update: Joel Olsen has a great post about permissions:

http://blogs.msdn.com/joelo/archive/2007/06/29/sharepoint-groups-permissions-site-security-and-depreciated-site-groups.aspx

SharePoint 2007 permissions functionality has increased so much (granularity / SharePoint groups / permission inheritance), that it is quite easy to get confused when trying to setup your permissions. As usual, Ton Stegeman has quite a few good articles about Permissions etc.

The basic idea is to create Permission Levels, and assign these permission levels to users or groups. Having the ability to inherit / break permissions as the need arises it ensures that virtually any kind of fancy permission setup can be implemented. It takes quite a lot of experimenting to understand and setup the permissions correctly, but with careful thinking and tweaking you should have quite an elegant end result.

Permission (Levels)
Permission levels are the various different rights which you can assign to different people / groups in a SharePoint site. By default, each site comes with a number of permission levels (Full Control / Design / Contribute / Read etc.) which you can customise to suit your needs. To create additional parent levels, go to the Site where you want to create a new permission level. Click on People and Groups > Site Permissions > Settings > Permission Levels. Here you can create your new custom permission levels. You can create permission levels from scratch, or copy existing permission levels.

After setting up the permission levels that you need, you need to setup the groups.

When you click on People and Groups you will be greeted by the following menu.


By default you are taken to the Groups

Groups -> contains all the groups within the Site Collection. Here you are able to see all the groups that exist in the current site collection.

You can customise this list (to show only the groups which are relevant to the current site), by cicking on Settings > Edit Group Quick Launch. You will then be able to choose which groups should be visible when you click on the Groups link (for the current site). This is especially useful, when you are not inheriting permissions from the parent site. Since you will probably have created custom groups for this site, this will allow you to show only those groups which are relevant to the current site.

In the groups you can also setup which groups will be the Owners / Members / Visitors for the current site. This is done by clicking Settings > Set Up Groups and assignin the rights to the appropriate groups. For most users this should be sufficient.

All People -> used to view (and manage) all people for the current site collection. What you will see is all users in the current site collection. It doesn't matter from which site you click the All People link, you will always see all the people which have some kind of permissions in the current site collection.

Site Permissions -> this is where the interesting stuff happens ;) (the assigning of permission levels to users group).

Once you have created your required permission levels, you need to assign these permission levels to particular users or groups in your site.

Your site must not inherit from its parent, to break the inheritance you need to click on Actions > Edit Permissions (and click Ok). What this does is create an exact copy of the permissions of the parent site. At this point you still basically have the same permissions as the parent. You can now remove any permission levels you don't need, and create new users / groups with the permissions levels you have setup earlier.

Anything which can be done for sites, can also be done for each list in each site, and each item in each list! Now that's what I call fine permission granularity!

Confused? Practice makes perfect ;) I will try to make another post with a few good examples...


Friday, 2 February 2007

SharePoint 2007: Content Deployment - Moving your content from Server to Server

The last cool feature that seems (up to now) to work like a charm in 2007 is Content Deployment. Basically, you can use content deployment to migrate your build from development to production. If you search for content deployment, I'm sure you'll find the nice MSDN blog which states how wonderful the content deployment is ... well, it is!

Ton Stegemen has a good blog about this: http://www.sharepointblogs.com/tonstegeman/archive/2006/12/30/17335.aspx
Even though Ton has code to do all the steps, you can do all of it without any code, through the Central Administration only.

The steps are:


  1. In the Destination Server go to Central Administration > Operations > Content Deployment > Content Deployment Settings, and set the server to Accept Incoming Content Deployment Jobs.


  2. There are other settings which you can do in this page like Encryption, or which server in a farm you will use for Import / Export. For my testing I didn't need any of them.

  3. Content deployment allows you to choose which Web Application / Site Collection to deploy to, therefore you need to make sure that the destination infrastructure has been setup correctly.

  4. The Site Collection you want to migrate to must be an empty Site Collection, i.e. it is very important to create a site collection based on a Blank Site template. If you don't have a blank site, you will get various errors. Most of them will be due to the fact that a number of Objects would have been already created. E.g. if you've created an (empty) Collaboration portal (assuming that all content will be copied to it), the content deployment will fail (because it will try to overwrite already existing objects and fail). Therefore, start with a clean slate (i.e. a Blank Site template).

  5. On the Source Server you need to create a Content Deployment Path from Central Administration > Operations > Content Deployment > Content Deployment Paths and Jobs. Create a new path, choose the Source Web Application / Site Collection, then specify the url of the Central Administration on the destination server. Don't put the Site Collection url, because Content Deployment works from Central Administration of the Source to the Central Administration of the server.


  6. Define the Authentication method that the Source Central Administration will be using to run on the Destination Central Administration. This means that the account you provide must have Central Administration rights on the destination server. This is another critical step. My test setup was between a normal network, therefore I used a Integrated Windows authentication account and used an account which existed on the destination server. Once you provide the correct credentials, the Central Administration will connect to the destination, and allow you to select the Web Application / Site Collection to deploy to.


  1. As soon as the Path is created, a Quick Deploy Job is automatically created. However, this is not the Job that you should use to Deploy all your content. This should be used for any updates, after you have migrated all the content already.


  2. Create a new Job (Migrate All) from the Path you have defined. Click the Path, and Create Job. Select the Path which you have created on the previous steps. Define whether you want to copy the entire site collection, or only a subset, and define a schedule (or run once). Run once allows you to run the Job ad hoc. Choose deploy only new, changed or deleted content, and specify email to send confirmation of finished job


  3. Therefore you should now have:
  • Destination Server which accepts Incoming Content Deployment Jobs connections.
  • Web application with a blank site Site Collection created on it.
  • Content Deployment Path with correct authentication from Source Server to Destination Server.
  • Job (Migrate All) which will be used to Migrate all the content.

  1. Click on the Migrate All Job, and Click Run now. Wait until all the content is copied!
  2. Once all the Content has been deployed if you update the source, you can re-run the jon to migrate new content to the destination.

Issues I have encounterd:

  • If you try to migrate the content using the Quick Deploy, it will succeed, however nothing will be actually copied. When I tried to re-run, I an unknown error was thrown. Once this error was thrown, I had to delete the Web Application at the destination and re-create it from scratch, and also create the Path and Job all over again! Bug maybe?

  • If you have enabled Self-Service Site Management, you need to ensure that any additional Site Directories have already been created on the destination Web Application. The content deployment will not create the Site Directories. For each Site directory you have, you must create a Site Directory based on the Blank Site template on the destination. Besides this you must create a new Path to each Site directory and a job which will copy the contents of the Source Site Directories.
Questions raised by the migration and which require testing: What happens when you migrate a build to a client, the client starts doing their changes, and then you need to update with another version of the build?

Still need to investigate this and probably other issues, however, the first encounter seems quite nice.

Thursday, 1 February 2007

SharePoint 2007: Web Capture Web Part

If you have experience with SharePoint 2003, you are most probably in love with the Web Capture Web Part.

To install this Web Part on WSS 3.0 you need to fiddle around a little. You can't just download the Office Web Parts and Component from MS, because it will complain that you need WSS 2.0 installed to be able to install the file...

Thanks to this post on Shane Young's blog, you can get the Web Capture in SharePoint 2007.

First of all you need to get a copy of the Office Web Parts (Web Capture) Cab files. If you have the Office Web Parts installed on a V2, you can get the cab file from
c:\program files\common files\micrsofot shared\web server extensions\60\wppacks

The cab file which contains the Web Capture file is "microsoft.office.dataparts.cab".

Edit: if you don't have the cab files, you can download them from here:
http://www.2shared.com/file/3663746/d9ecea5d/MicrosoftOfficeDataParts.html (New download link)

Copy this file to your 2007 installation, put it in an accessible location (C:\spswebparts) and run the following command:

C:\Program Files\Common Files\Microsoft Shared\web server extensions\12\BIN>stsadm -o addwppack -filename "C:\spswebparts\microsoft.office.dataparts.cab" -globalinstall

followed by iisreset. Et voila, you can add the Web Capture web part to your web part zones!

You should be able to install most Web Parts from 2003 using this method!