Sunday 29 April 2007

SharePoint 2007 - Creating custom search scopes

By default SharePoint sites comes with a number of search scopes:

  • People
  • All Sites

besides the implicit search scopes which change according to the context:

  • This Site
  • This List

You can however create your own search scopes, to be able to filter your search results according to a number of rules. All this functionality is available out of the box and using the administration interface, and that gives you lots of flexibility and customisation.

Creating New Search Scopes

You can create your search scopes from the SharedServicesProvider:

SharedServices > Search Settings > Scopes (Click on the default scopes to add your own scope).

Give your new scope a name (e.g. you just want to search in Document Libraries). Once you have created the scope, you need to Add Scope Rules for this scope.

There are once again various rule types you can use:

  • Web Address (URL / Hostname / Domain / Sub-domain) - in our example here you add the specific urls of each document library that you want to target with your search scope

  • Property Query (here we can define scope rules based on Property Mappings in indexed items. e.g. Author, FileExtension etc. If you don't find the property you are looking for, you need to go to Search Settings > Managed Properties click on the specific property (e.g. FileExtension) and click on "Allow this property to be used in scopes". The property will then be available when defining new rules using the Property Query. If you only want to find Excel files using this scope using FileExtension = xls


  • Content Source (You can choose which content sources are available for this scope. A good example when to user this is if you want to create a search scope for a network drive you have indexed)

For each of the above you can also specify the behaviour of each rule i.e. whether to include / require / exclude the rule E.g. you can choose to exclude files written by a particular author.

Once you have defined all the rules for your new search scope you need to perform a full crawl of your Content Sources, and then perform an update of the Search Scopes. These functions can all be done from the Search Settings page of the SharedServices Provider.


Once this is done, you need to enable the Search Scope (either for the Search Dropdown, or for the Advanced Search or both) in the Search Scope settings of your Site Collection (this is done from the actual frontend not from the Central Administration). In the Site Settings > Search Scopes you click on the display group you want, and set the order that the scope should be visible.


As you can see, the scopes are quite a powerful tool in your arsenal. What I like about this is that instead of having just a top-down search scope (as per default scopes), you can have a scope which is across sites, but limited to certain parts only.

Tuesday 24 April 2007

SharePoint 2007: Filtering data views with ASP.NET controls

http://blogs.msdn.com/sharepointdesigner/archive/2007/03/05/asp-net-controls-filter-the-data-view.aspx

Although I haven't tried it myself (yet), this post looks interesting.

Monday 23 April 2007

SharePoint 2007: Query Parameter Filtered Data Views

Using the standard SharePoint OOTB functionality (i.e. using connections from web part to web part) you can filter items in connected web parts but you cannot have only the selected item in the current web part.

Original Web Part (no filtering on selected item)


Data views and SharePoint Designer come to the rescue to filter on the selected item only. You can change the List View Web Part to a Data View Web Part, and then use filters on it to show only the items you need. Using an "old" article "How to use a URL parameter to filter a Data View Web part in FrontPage 2003" and the following article regarding customization of XSLT Data Views you can create this solution.

In SharePoint Designer: Create a new web part page or save the AllItems.aspx (or any other page you want to start from) page as AllItemsEdit.aspx.

Right click on the List Web Part you want to filter and click "Convert to XSLT Data View". 
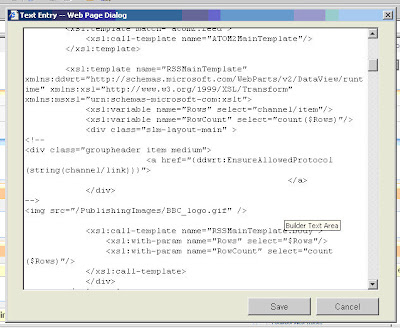
This create a Data View web part. To show only the currently selected item you need to change the filterParam ParameterBinding of the DataView from:

ParameterBinding Name="filterParam" Location="Postback;Connection;"

to

ParameterBinding Name="filterParam" Location="Postback;Connection;QueryString(ID)"

You can put any query parameter instead of ID. I chose to use ID because I will be using the original DispForm link (which already contains the ID param) and thus I won't have to create my own custom URL.

You then need to apply a filter on the Data View. Click on Data View > Filter in SharePoint Designer. Create a new Filter on the column you require, in my case it will be on the ID. In the Value field on the filter you need to use the Drop Down and choose the [Input Paramater].

Save the page, access it with the correct URL, and you should have the filtered item(s) only. You can then add additional web parts and connect them to the filtered data view, or do any other modifications you require.

Connected Web Part showing only selected item:

Beware: This creates Data Sources and other items linked to the current installation which will break if you export to a different installation. (unless you use this solution: Solving the List Guid problem

Wednesday 11 April 2007

SharePoint 2007: Print List Feature

http://www.codeplex.com/features

If you go to the URL above and click on Releasease you will find a Print List Feature which once installed and deployed will give a Print List feature. The nice thing about this feature is that you can choose the view you want to print, whilst the ugly thing is that the drop down used to choose the view is not hidden (and has to be printed).

The feature is based on the http://www.sharepoint-tips.com/2007/01/how-to-add-print-list-option-to-list.html by Ishai.

Monday 9 April 2007

SharePoint 2007: Filtered Lookups

I've come across a requirement which is quite basic, creating a filter on a Lookup field in a List. Basically I have a list of Vacancies, and another list which looks up at the Vacancies list. I want the lookup field to only show those vacancies marked as Open.

SharePoint does not support this OOTB, however with a little playing around and using SharePoint Designer you can manage to get this to work.


  • Create a new Custom Form
  • Open SharePoint Designer, open the NewForm.aspx page, and create a new aspx page from the NewForm.aspx and save it as NewFormFiltered.aspx
  • Delete the list Web part which exists and Click Insert > SharePoint Controls > Custom List Form, and choose based on a New Item (since you are editing the New Item form).


  • Create a new DataSource to the List you need to filter upon
  • In the custom page you are creating find the DataSource tag in the source code sharepoint:spdatasource and create another datasource similar to the one which exists, however with a new different datasource ID e.g. FilteredDS, and a different SelectCommand.
  • The SelectCommand is used to create a query which filters your data e.g. if you filter on the Open Status it should contain something similar to the following:
  • This filter can be written in the Tag Properties of the DataSource.

  • Any parameters contained within the datasource and which contain List GUIDs based on the list you are editing should be edited to point to the GUID of the list you are filtering on.
  • Add a SharePoint DropDown List
  • Find the lookup field which you want to filter in the page, and comment out the SharePoint:FormField. Insert a SharePoint:DVDropDownList and customize the properties similar to the following:

Where ff9 should be the position in the FormField you have commented out, the datasourceid should be the id of the datasource you created, and the @Vacancy should be the name of your colum.

Save and test by clicking on New Item in the customised list, and in the address change the address of the page which comes up to the name of the page you have customised. If you’ve done everything correctly, you should have a drop down list bound to the filtered data source you created.

  • Edit the List such that New button refers to the new page you have created
  • Once you’ve ensured that the List is ok, you need to edit the List Properties such that your edited page is displayed when you press the New Item button.
  • Go to the List Properties, Click on the Support Files tab and choose your page as the NewItemForm. Make sure the Content Item is set to Item or Task or your content Item not Folder. If it is set to Folder your changes are silently ignored, simply not saved.


The most toublesome parts are getting your data source(s) to filter correctly, and getting the DV drop down list to actually post the data to the list, but with a little playing around you should be able to do it.

Errors you may encounter: Strangely SharePoint sometimes changes the ID of the datasource to the name plus 0 e.g. FilteredDS0. Since your datasource is still bound to the original name, when you access the page you get an error: "An unexpected error has occurred".

Data Source Creations hints: to create your data source, go to the Data Source Library, click on Copy and Modify, create a new data source with the filter you require, same it as XML. Open the XML file and copy the SharePoint datasource from the xml file and paste it into your designer code. Strangely, the Guids in the data source from the XML file do not contain the curly brackets {}, and will result in the drop downs not getting populated until you surround each Guid with curly brackets.

Update:

BEWARE: Using this method you will be tying yourself down to a list Guid. Thus if you try to export and import onto a different server, you will get an error when you try to load the page since the list (Guid) will not be found. You would have to use designer (again) to update your Guids on the live server! Keep this in mind when using this hack.

Update 2:

This may solve the Guids problem: http://www.sharepoint-tips.com/2007/04/fixing-lookup-fields-in-list-definition.html

Update 3:

This definetely solves the problem: Solving the List Guid Export Problem

Update 4: Programmatic solution to filtered lookups - Cascading dropdowns

http://datacogs.com/datablogs/archive/2007/08/26/641.aspx

Thursday 5 April 2007

SharePoint 2007: Creating a custom New Item and Edit Item for Lists

Kristian Kalsing explains how to do this on his blog.

  • Open the site in SharePoint Designer.
  • Browse to the list and open the 'NewForm.aspx' web form.
  • Click File > Save As... and give the form a new name such as 'NewFormEdited.aspx'
  • Delete the default List Form Web Part from the page.
  • Click Insert > SharePoint Controls > Custom List Form.
  • In the List or Document Library Form dialog, select the appropriate list, content type and type of form.
  • Click OK and a new Data Form Web Part is added with controls representing all the fields from the list.
  • In the newly added Data Form Web Part, delete any rows containing fields not to be shown to the user (ensure that fields being removed are not required fields without default values as this would prevent the user from submitting the form).
  • At this point, you can do other customisation such as rearranging the fields if you wish.
  • Save the site.

Tuesday 3 April 2007

SharePoint 2007: Changing the title of an RSS Feed in the RSS Viewer web part

You might usually find that the RSS Viewer displays an RSS Feed title which you don't really like and which you want to change. Or you might want to add a nice image to your RSS feed. You can by hacking into the XSL used by the RSS Viewer Web Part.

Steps to do this:

  1. Edit Page, and Modify Shared Web Part
  2. Click on the XSL Editor
  3. Find the following div: groupheader item medium

You can now do any changes you want to the anything inside the div. Ideally just comment (HTML) out the original so you can revert to the original if you break something or keep a copy of the original XSL.

E.g


or even nicer (upload CoolRSSImage.jpg) to your publishing Images


Final Result


kick it on SharePointKicks.com